This chapter describes basics of article and category creation, and drafts usage.
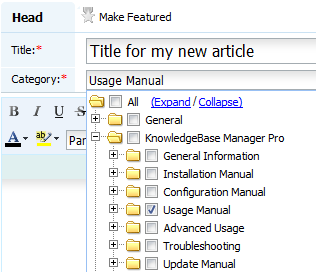
You must have at least one category in the knowledge base to create an article because article may exist only if it is assigned to a category. If you're starting with an empty knowledge base, you need to create a category first. Otherwise you can skip the next step and create an article right now.
Creating a Category
There are several ways create a new category. The easiest way is this:
- Go to Article > Articles & Categories page and click "Add Category" on the left pane toolbar.
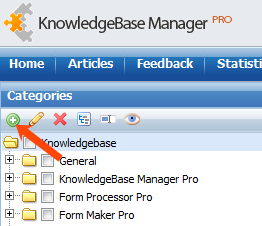
Give it a name and hit Enter or click on the green Apply button.
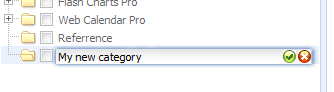
Note that the category will be created as a child to the currently selected category. You can select a category by single clicking on it - selected category has blue background.
It is the fastest way to create a category, because you are not asked for anything else except category name. Use this method in future if you need to quickly create several categories.
We got our first category created; now we can add an article to the knowledge base.
Creating an Article
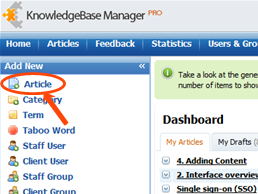
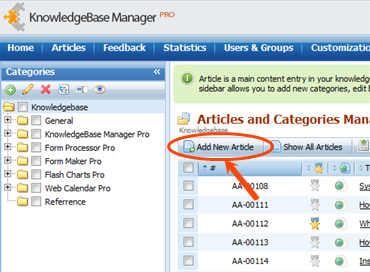
There are several equivalent ways to start creating a new article. You can:
- Click the "Article" button on the "Add New" pane on the back-end home page.
- Select Articles > Add an Article in the main menu.

- Go to Article > Articles & Categories page and click "Add New Article" on the grid toolbar.
When you do this, the article creation window opens.
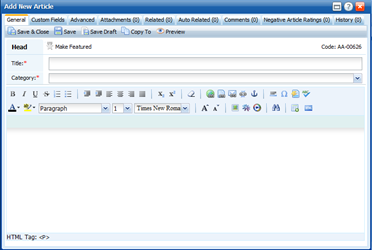
The main screen of the article creation window is comprehensible and intuitive. To finish creation of the article you need to give it a title and assign it to a category.
Take a look the buttons toolbar. There are several buttons on it.

|
Save & Close |
Saves the article and closes the article create/edit window.
|
|
Save
|
Just saves the article without closing the window
|
|
Save Draft
|
Saves changes as your personal draft. Article itself is not changed. Your draft cannot be viewed by anyone else. You can continue to edit this draft later and save it as an article or delete eventually.
|
|
Copy To
|
Copies the article to the category by your choice.
|
|
Print
|
Shows printable version of the article and asks you to send it for printing.
|
|
Export to PDF
|
Exports the article to PDF.
|
|
Preview
|
Shows preview of the article with the latest (even unsaved) changes in the front-end.
|
Also notice the Make Featured button below.
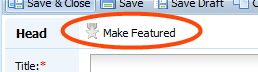
Click it to make your article "featured". Next click will remove this status. Use it to promote articles and show them on the top of various lists in the front-end: featured article is shown on the top of the articles list when you're viewing a category contents and in the category tree. Featured status overrides articles sorting.

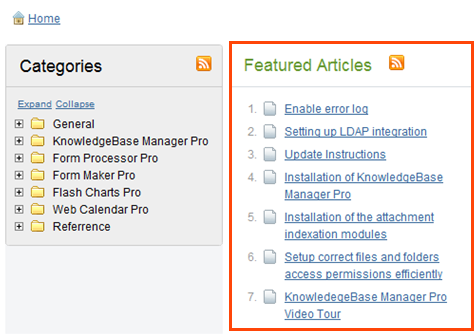
Also there is Featured Articles list on the main front-end page, which shows the most popular featured articles. Use it for the most valued articles like "Beginner's Guide" or top news.
Article body with WYSIWYG toolbar is shown below. You can type there, copy-paste text from a text editor or web page, and use WYSIWYG buttons to change text look and feel, alignment, colors, insert images, links, tables, and videos, and also edit html source.
The article creation window has several tabs that allow you do change advanced settings, custom field values, versions, etc. We will talk about them later during discussion of article edit function.
Using Drafts
It was mentioned previously that there is Save Draft button on the tool bar or article create/edit window. It saves current article title, body, attached documents, and all preferences to drafts. Also, if you haven't saved your article and try to close the article edit window, it will ask you what must be done with your changes and you can save them to a draft.

- Exit Without Saving - discard changes and keep the latest saved article version.
- Save Article - save changes to the article.
- Save Draft - save changes as your personal draft.
- Cancel - cancel article closing attempt and return to article editing.
Click "Save Draft". Then go to Articles > My Drafts. You will see your draft in the list. You can see on the next screenshot that there are two types of drafts: draft of a new article, and draft of an existing article.
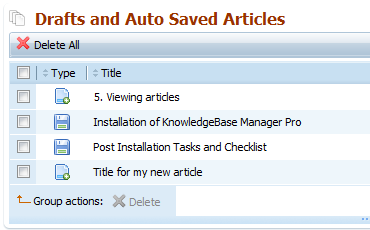
They have different icons here, if you hover your mouse over an icon, you will see the hint that explains the draft type:
 Draft of an existing article - either saved manually or by autosave (you can have only one draft per article, if you save this draft, the old draft gets rewritten)
 Draft of a new article - (you can have as many drafts of new articles as you want)
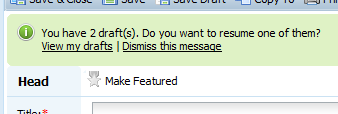
You can continue editing a draft from here by clicking "Resume". You will also be advised about existing drafts when you will try to create an article or edit an article for which you have a draft version saved.

There are several options:
- View difference - compare the draft with the current article (this option won't be shown if you're creating a new article)
- View - open a window where you can view the draft contents (this option won't be shown if you're editing an existing article).
- Resume - load the draft to the current article edit window, so you can continue to edit it.
- Dismiss this message - hide this info message (only this time).
If you're creating a new article, and there are several drafts available, you will see a slightly different message.
- View my drafts - go to Articles > My Drafts (closes the current article edit window).
- Dismiss this message - hide this info message (only this time).
Also draft of the article you're currently editing is being saved automatically at certain intervals (by default it is 30 seconds, but this can be changed by administrator at Administration > General Settings > General).
We will learn how to edit articles and change advanced article properties in the next chapter.
 Categories