Online Chat
 Call Us: 
1-877-744-1221
Browse Submit a Ticket
 
Advanced Search
Tools
Rss Categories

Syntax highlighting

Author: Edward Hardin Reference Number: AA-00736 Views: 8587 Last Updated: 09/26/2012 07:19 PM 0 Rating/ Voters

You can use a 3rd-party plugin for syntax highlighting in KMP. This article describes how to use the Prettyprint plugin for that.

Hosted KB

If you're using the Hosted Edition of KMP and thus do not have ability to upload the script to the server, please contact us and we will install the plugin for you.

Prettify Installation

  1. Download a distribution.
  2. Create a directory named "prettify" in the same directory on the server as "admin", "help", and "hosts" directories of KMP are located within.
  3. Upload the contents of the "google-code-prettify\distrib" directory from the Prettify distribution to that folder.
  4. If you do not have a custom front-end theme, create it now.
  5. Go to the Customization > Manage Templates page.
  6. Open the Layouts > Article entry and add the following code right before the closing </head> tag:
    <link href="https://www.web-site-scripts.com/knowledge-base/admin/../prettify/prettify.css" type="text/css" rel="stylesheet" />
    <script type="text/javascript" src="https://www.web-site-scripts.com/knowledge-base/admin/../prettify/prettify.js"></script>
  7. Add onload="prettyPrint()" to the <body> tag.
    For example, the <body> tag looks like this:
    <body class="" style="position:relative;">

    here is how you add the onload parameter:

    <body class="" style="position:relative;" onload="prettyPrint()">

  8. Click "Apply Changes" to save the changes.
  9. Go to Articles > Article Templates.
  10. Add a new template named e.g. "Highlighted Code".
  11. Switch to the HTML source mode:

  12. Add this code to the body:
    <pre class="prettyprint">insert_code_here</pre>
  13. Click "Save & Close".
  14. Optional: Modify the prettify.css stylesheet to get the coloring you prefer.

Now you're ready to use the plugin.

Inserting Codes

  1. Copy the code you want to insert to clipboard (Ctrl-C). We recommend to copy it from plain-text editors, such as notepad, otherwise formatting from the source application (such as Word, or web page you're copying it from) may interfere and the look of the code might be different from expected.
  2. Open an article for editing or create a new article.
  3. Put keyboard cursor to the place where you wish to insert code.
  4. Insert the Highlighted Code template by clicking the template insertion button and then clicking on the template name:

  5. You will see the "insert_code_here" writing. Double-click on it - it will make it selected - and press Ctrl-V to insert the code.
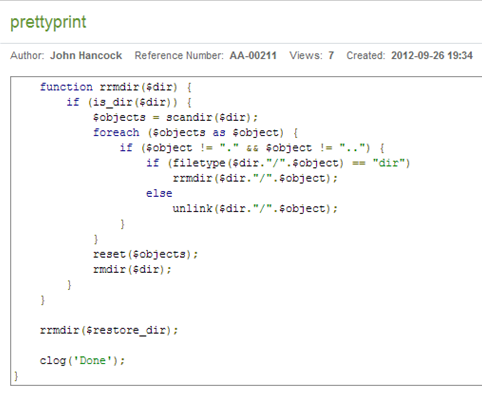
  6. Please note that code will not be highlighted in the edit mode. You'll see the colors only after clicking "Save & Close" and opening the article in the front-end. You'll see something like this:

For information about installing the plugin to KMP, feel free to contact us.

For information about customizing the colors and other questions related to plugin features, check the FAQ of the plugin authors.