Online Chat
 Call Us: 
1-877-744-1221
Browse Submit a Ticket
 
Advanced Search
Tools
Rss Categories

PHP installation on IIS7, IIS7.5, and IIS8

Author: Edward Hardin Reference Number: AA-00495 Views: 112992 Last Updated: 06/06/2017 05:03 PM 100 Rating/ 1 Voters

This guide describes installation of PHP with FastCGI on IIS7 / IIS8 server.

Actual PHP versions work with IIS via FastCGI interface. We will explain how to install FastCGI and configure it to work with PHP.

Installing the FastCGI Extension for IIS 7 / IIS 8

Windows Server

Add the CGI role service by going to Server Manager -> Roles -> Add Role Services. This enables both the CGI and FastCGI services:


Windows 7 and Windows Vista SP1

Add the CGI feature by going to Control Panel -> Programs and Features -> Turn Windows features on or off. This enables both the CGI and FastCGI services.


    Download and Install PHP

    1. Download a PHP package for Windows 
      You need the latest version of PHP v5.6 family. Choose ZIP package VC11 x86 Non Thread Safe.
      Warning Box Title

      Please note that PHP v7.* and x64 versions are not supported at this time.

    2. Extract the contents of PHP zip package to a folder on your server, e.g. C:\PHP\
    3. Make a copy of the php.ini-production file and name it php.ini
    4. Open the php.ini and setup the following parameters. Every parameter already exists in the php.ini and you just need to find it, uncomment (by removing ";" character from the beginning of the line), and change its value. Make sure that you do not have one of these options specified twice in the php.ini file.

      memory_limit = 256M
      post_max_size = 128M
      extension_dir = "C:\PHP\ext"
      upload_tmp_dir = "C:\PHP\upload"
      upload_max_filesize = 128M

      max_execution_time = 600
      max_input_time = 600
      max_input_vars = 2000

      cgi.force_redirect = 0
      cgi.fix_pathinfo = 1
      fastcgi.impersonate = 1

      extension=php_curl.dll
      extension=php_mbstring.dll
      extension=php_exif.dll
      extension=php_gd2.dll
      extension=php_ldap.dll
      extension=php_mysqli.dll

      session.save_path = "C:\PHP\session"

      session.use_cookies = 1

      Extensions Loading Order

      It is required to load "php_mbstring.dll" extension before "php_exif.dll". Make sure that order of extensions in your php.ini is the same as shown above.

    5. Create "upload" and "session" sub-directories in the C:\PHP\ directory. You can use different names, just make sure that they match upload_tmp_dir and session.save_path parameters that you've set in the php.ini.
    6. Setup date.timezone parameter in php.ini, for example:
      date.timezone = "America/New_York"

      Chose your city or at least a city from your time zone.

      You can find the full list of possible date.timezone values on PHP.net website.

    7. Save the php.ini.
    8. To test if the PHP installation is successful, run the following from the command line prompt:
      C:\PHP>php -i

      If PHP Fails to Start

      VC9 Versions are compiled with the Visual Studio 2008 compiler and have improvements in performance and stability. The VC9 versions require you to have the Microsoft 2008 C++ Runtime (x86)  or the Microsoft 2008 C++ Runtime (x64)  installed. You may need to download these extensions on old versions of Windows if PHP is unable to start.

    Configure IIS 7 to Handle PHP Requests

    In order for IIS 7 to host PHP applications, it is necessary to add a handler mapping that tells IIS to pass all PHP specific requests to the PHP application framework via FastCGI protocol.

    This can be done using IIS Manager or using command line.

    Using IIS Manager

    Open IIS Manager and then select and open "Handler Mappings" at the server level:

    Select the "Add Module Mapping" action and specify the configurations settings as below:


    • Request path: *.php
    • Module: FastCgiModule
    • Executable: "C:\PHP\php-cgi.exe"
    • Name: PHP via FastCGI

    Note

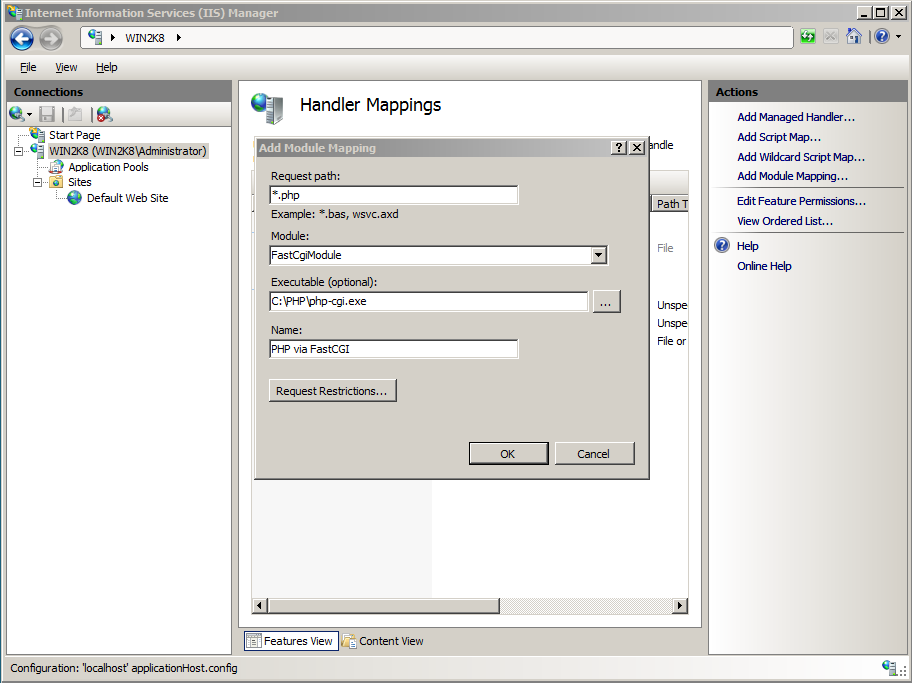
    If you do not see "FastCgiModule" in the "Modules:" drop-down list then it means that the module is not registered or not enabled. To check if FastCGI module is registered open the IIS configuration file %WINDIR%\windows\system32\config\applicationHost.config and check that the following line is present in <globalModules> section:

    <add name="FastCgiModule" image="%windir%\System32\inetsrv\iisfcgi.dll" />

    Also, in the same file, check that the FastCGI module is added to the <modules> section:

    <add name="FastCgiModule" />

    Click OK. A dialog box appears asking if you want to create a FastCGI application for this executable. Click Yes.

    Setting FastCGI Configuration for Optimal Performance

    Watch this short video to learn how to setup optimal performance for FastCGI

    Ensure that the Administration Pack for IIS 7 is installed on your server! If not - please install it, otherwise you wouldn't see the option for configuring FastCGI settings!

    Take the KnowledgeBase Manager Pro Video Tour

    Configure default document in IIS

    Most of the PHP applications use a file named index.php as the default application document. Configure IIS to treat this file as the default content page:

    1. Open IIS Manager and then select and open "Default Document" at the server level:


    2. Click "Add..." and enter "index.php".

    Testing PHP CGI

    After installing the FastCGI extension, and registering and configuring the PHP CGI, you can use KMP normally.

    Restart the IIS server to apply all changes that you've made.

    To test, create and request an info.php page in your site that contains the following:

    <?php
    phpinfo();
    ?>

    You see something like: 


    Note that the Server API indicates that PHP is hosted in FastCGI mode.

    Information Box Title

    Default settings of IIS7 conflict with filename escaping methods used in KMP for attachments and images that contain a whitespace in their names. Check this this guide to set correct option and you  won't run into such issue in future.