Online Chat
 Call Us: 
1-877-744-1221
Browse Submit a Ticket
 
Advanced Search
Tools
Rss Categories

 Featured
Setting up LDAP integration

Author: Edward Hardin Reference Number: AA-00439 Views: 28097 Last Updated: 06/18/2013 10:03 AM 100 Rating/ 1 Voters

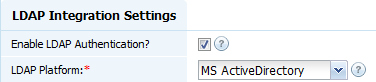
This article describes how to setup LDAP integration in Knowledgebase Base Manager Pro. 

What is "LDAP"?

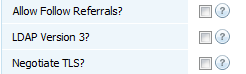
LDAP stands for Lightweight Directory Access Protocol, and allows usage of single user account directory to login to various applications.

  You can use existing LDAP server to manage user integration and authentication with following options:

  • Authorization
  • Group Mapping
  • Synchronization of User Details
  • Synchronization of Groups
  • User Group Assignment
  • LDAP version 3 support
  • And much more is available with LDAP support now.

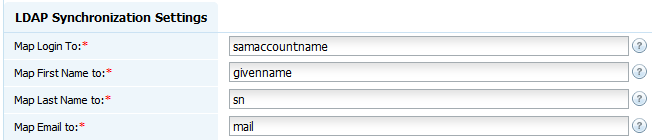
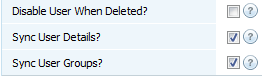
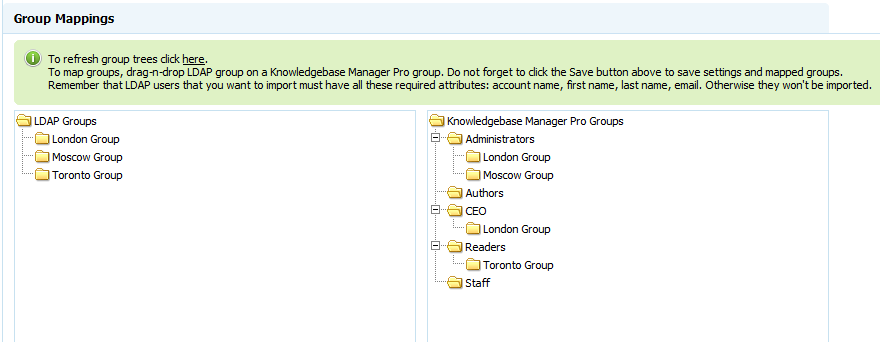
As well as integration, user account details can be synched and LDAP groups can be mapped with KnowledgeBase Manager Pro groups for role-based permissions.

 Setup Instructions

  1. Go to the "LDAP Settings" section in Administration > General Settings.
  2. First of all tick the "Enable LDAP Authentication" checkbox to start and select a LDAP platform.

    Enable LDAP authentication and select LDAP platform

  3. Specify correct LDAP host and port.

    LDAP Host and Port

    Double check these settings because application may freeze for 10 minutes if you try to connect to nonexistent LDAP server. 

    LDAP host and LDAP port

    LDAPS (LDAP via SSL)

    If you would like to enable LDAPS (LDAP via SSL) you may need to follow the instructions in this guide (for IIS and Apache on Windows 2003/2008).

  4. Specify additional connection settings.
    If your LDAP server hold references to other servers you may want to enable "Allow Follow Referrals" option.
    Enable "LDAP Version 3" option if you would like to use LDAPv3 protocol.
    The "Negotiate TLS" option allows establishment of Transport Layer Security on the connection.

    Follow referals, LDAP version 3, negotiate TLS

  5. If you would like to get users by certain parameters, you may want to modify the "Search String" value. Otherwise, left the default value.

    Search string

  6. Usually "Base DN" consists of two parts: OU (Organizational Unit, "company" in our example), and dc (Domain Component, "example" and "com" in our example; if your LDAP server name includes more domain levels, there will be more dc's).
    You may not specify OU and get full tree of directory groups then.
    Object Unit

    If you specify OU (Organizational Unit), make sure that LDAP users that you want to import belong to this OU as well as their parent groups. Otherwise, they won't be imported.

    Base DN

  7. Setup username and password for connection on the LDAP server. This user must have permission to see LDAP entries.

    Connection username and password

  8. Check the mapping attributes.

    Mapping Attributes

    Remember that LDAP users that you want to import must have all these required attributes: account name, first name, last name, email. Otherwise they won't be imported. Make sure that attributes here in KMP preferences match user attributes on the LDAP server.

    Attributes mapping

  9. Setup synchronization options.
    If you would like KMP to inactivate user account if he gets deleted from the LDAP server, set the "Disable User When Deleted" checkbox.
    If you would like to synchronize LDAP user details and LDAP groups each time a LDAP user log in, set checkboxes accordingly. If these checkboxes are not set, account and group information will be synchronized upon the first login only.

    Syncronization options

  10. Check "Group Mapping Settings".
    A user that belongs to a LDAP group that is not mapped to any KMP group will be assigned to the group set in "Default Group Mapping Action".
    Check the "LDAP Group Member Attribute" to match the group entry that stores a list of group members.
    Check all LDAP settings, click "Save" above and mark the "Enable LDAP Group Mapping" to start mapping.


  11. You will see the tree of LDAP groups on the left upon successful connection and the tree of KMP groups on the right. Now you need to map some groups from the LDAP server with groups in KMP. Mapping of LDAP group A to KMP group B means that users from LDAP group A will be assigned to the KMP group B.
    Just drag-n-drop a LDAP group to a KMP group to map them. You can map several LDAP groups to one KMP group. Click "Save" above when finished.

    Group mappings


  12. After successful mapping you can proceed with one of the two approaches.
    • You can go to Users & Groups > Manage Users and click the "Get LDAP Users" button to import LDAP users to KMP immediately. Please note that usage of the "Get LDAP Users" button is not required for successful integration of KMP with your LDAP directory - there is no need to import all LDAP users at once, especially considering limited number of user accounts in KMP. When someone tries to login to KMP and KMP doesn't have this user account in its database, it asks the LDAP server and if a user with these username and password exists on the LDAP server, the account in KMP will be created automatically. Also, "Get LDAP Users" has some limitations due to limits of LDAP servers - they often do not allow to get more than a 1000 users at a time remotely, and if you're using "Get LDAP Users" button while having thousands of users on the LDAP server, you may not find the user that you wanted to import. This doesn't mean that LDAP or KMP functions incorrectly - simply use it another way as specified below:
    • Or you can skip the "Get LDAP Users" step and try to login as one of the users from mapped groups. If all settings are correct, you'll be able to login with username and password of this user gotten from the LDAP server. Account in KMP will be created automatically upon login.
If you have any issues with LDAP integration, check the LDAP troubleshooting guide.